Knowing how to clear storage on your iPhone can save you from the dreaded “Storage Full” notification while enhancing your device’s performance.
It’s only natural for your iPhone’s storage to swell with time, but letting it fill to the brim prevents new downloads and media captures. To help you with that, we’ll demonstrate how to clear your storage in a few simple steps.
However, if your phone remains slow even after clearing storage, consider upgrading to the best iPhone.
Tools and requirements
Steps for how to clear storage on iPhone
- Review storage recommendations: Settings > General > iPhone Storage > Recommendations > review and delete.
- Delete apps: Settings > General > iPhone Storage > Select apps > Delete App.
- Offload apps: Settings > General > iPhone Storage > Select apps > Offload App.
- Delete Music: Settings > General > iPhone Storage > Music > Edit > Tap the minus icon > Delete.
- Delete messages and attachments: Messages > Select message category > Options (three dots) > Select Messages > Choose messages to delete > Delete.
- Clear Safari cache: Settings > Safari > Clear History and Website Data.
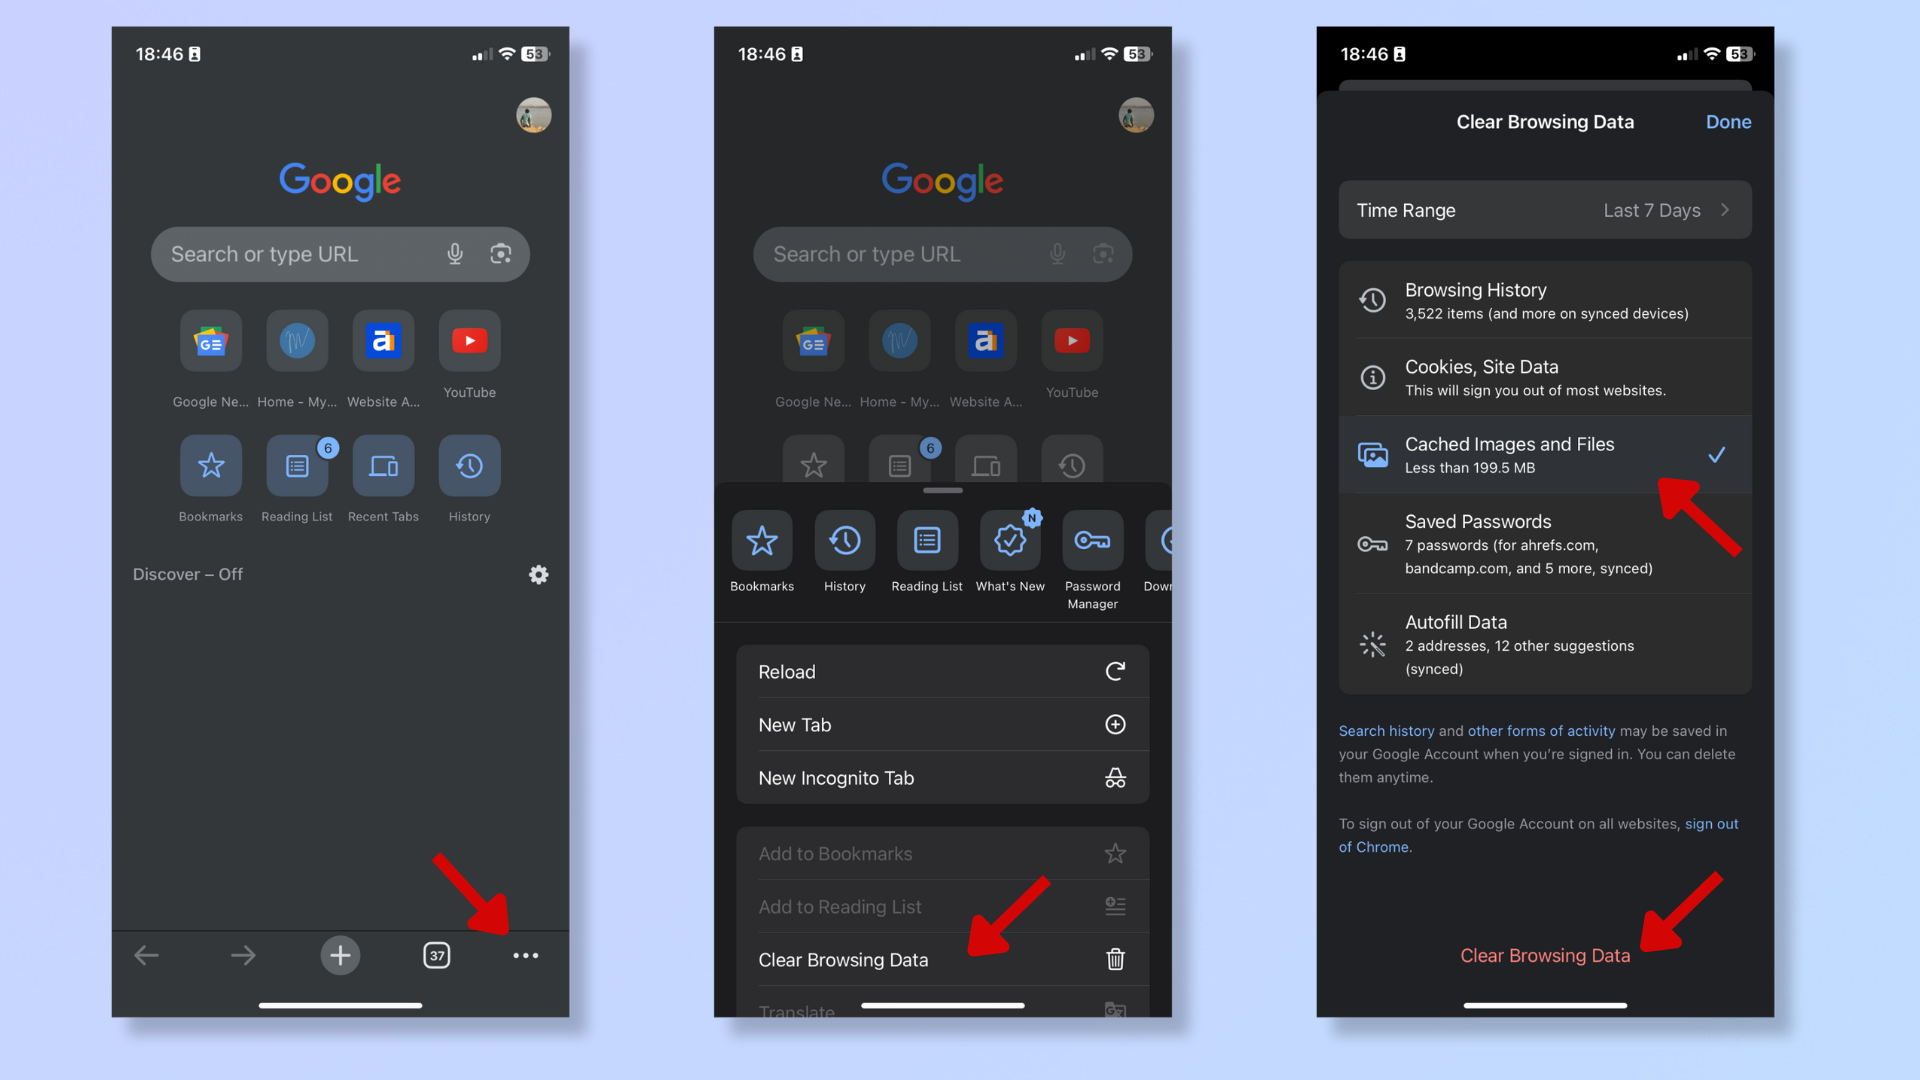
- Clear Chrome cache: Chrome > Options (three dots) > Clear Browsing Data > Select Cached Images and Files > Clear Browsing Data.
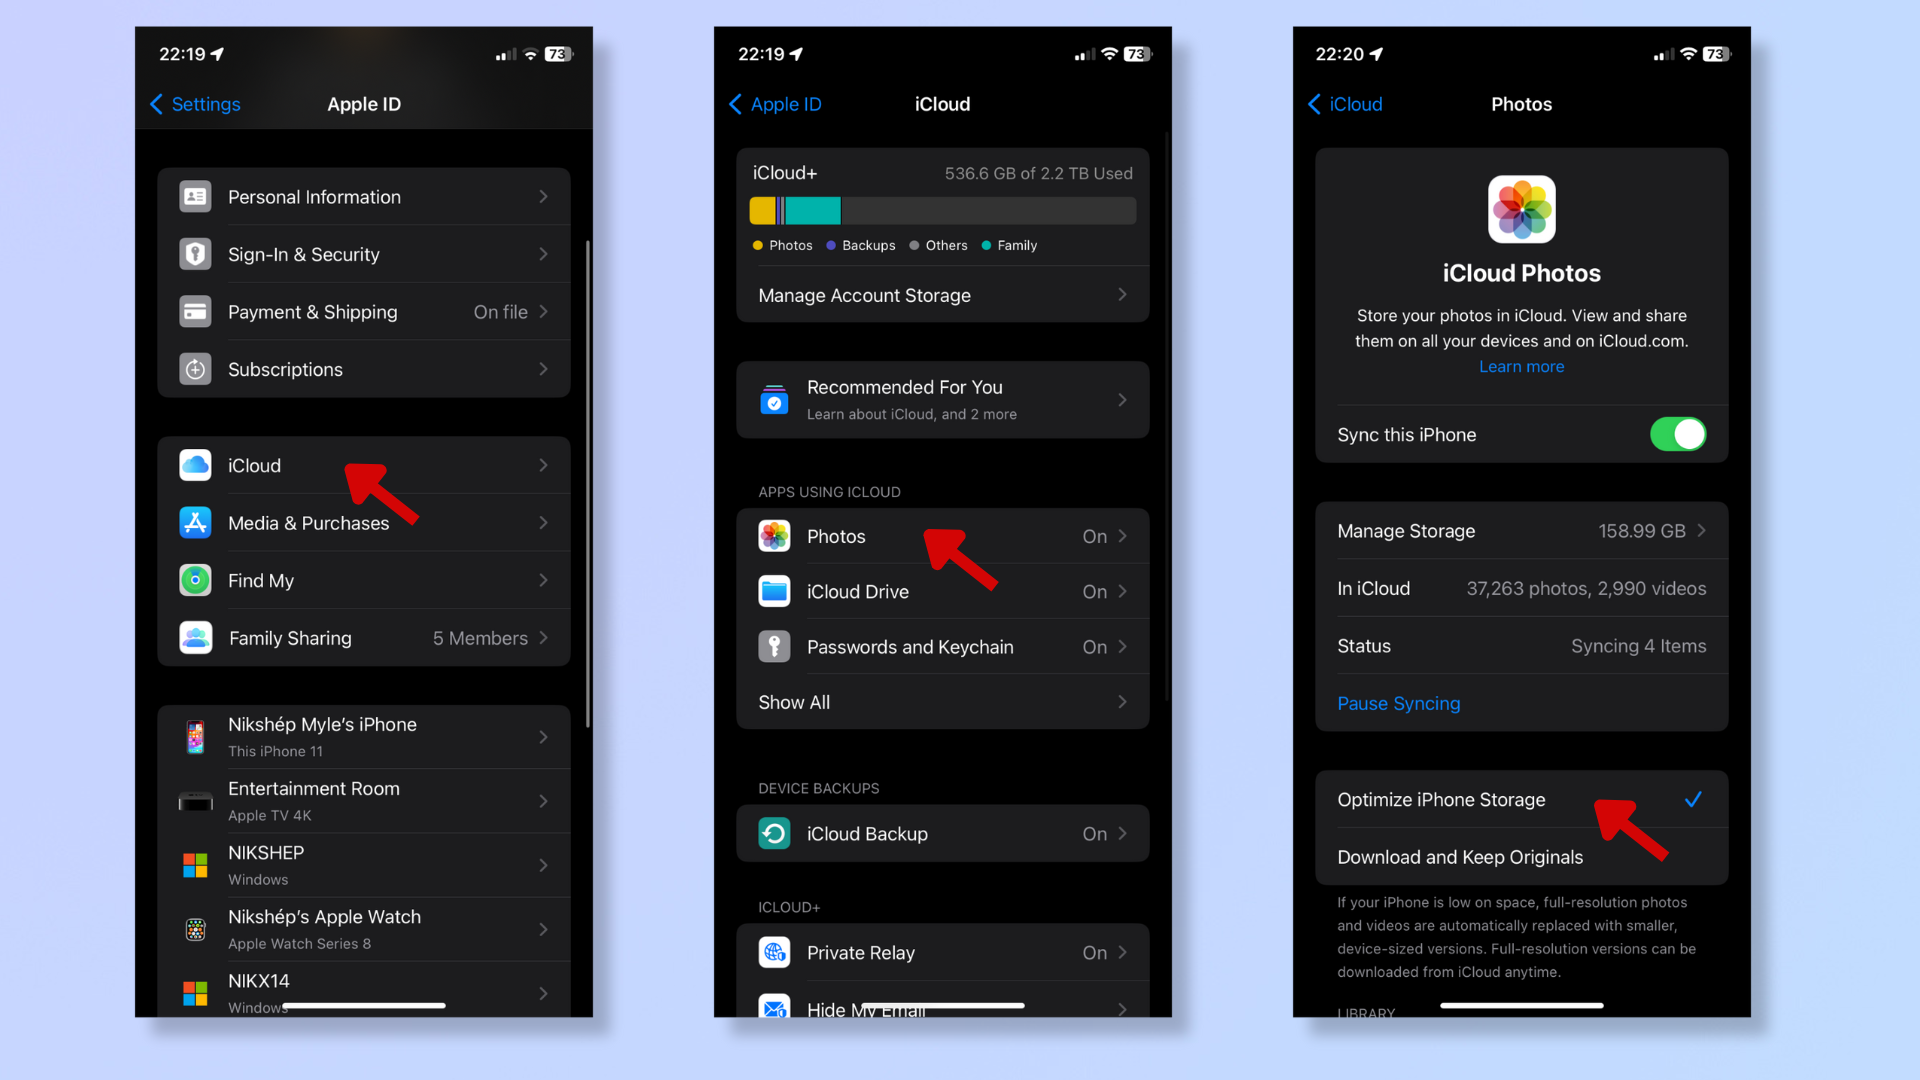
- Optimized photo storage (iCloud): Settings > Your name > iCloud > Photos > Optimize iPhone Storage.
Step by step guide to clear storage on iPhone
Before you make any changes, it’s always safest to back up your iPhone using iCloud or your computer to avoid losing important information.
1. Review storage recommendations
(Image: © Future)
Go to Settings > General > iPhone Storage to find a color-coded storage breakdown at the top.
Below the breakdown, you’ll find Recommendations to clear out space. Select it to view and delete files (like videos and audio) you no longer need.
2. Delete or offload apps
(Image: © Future)
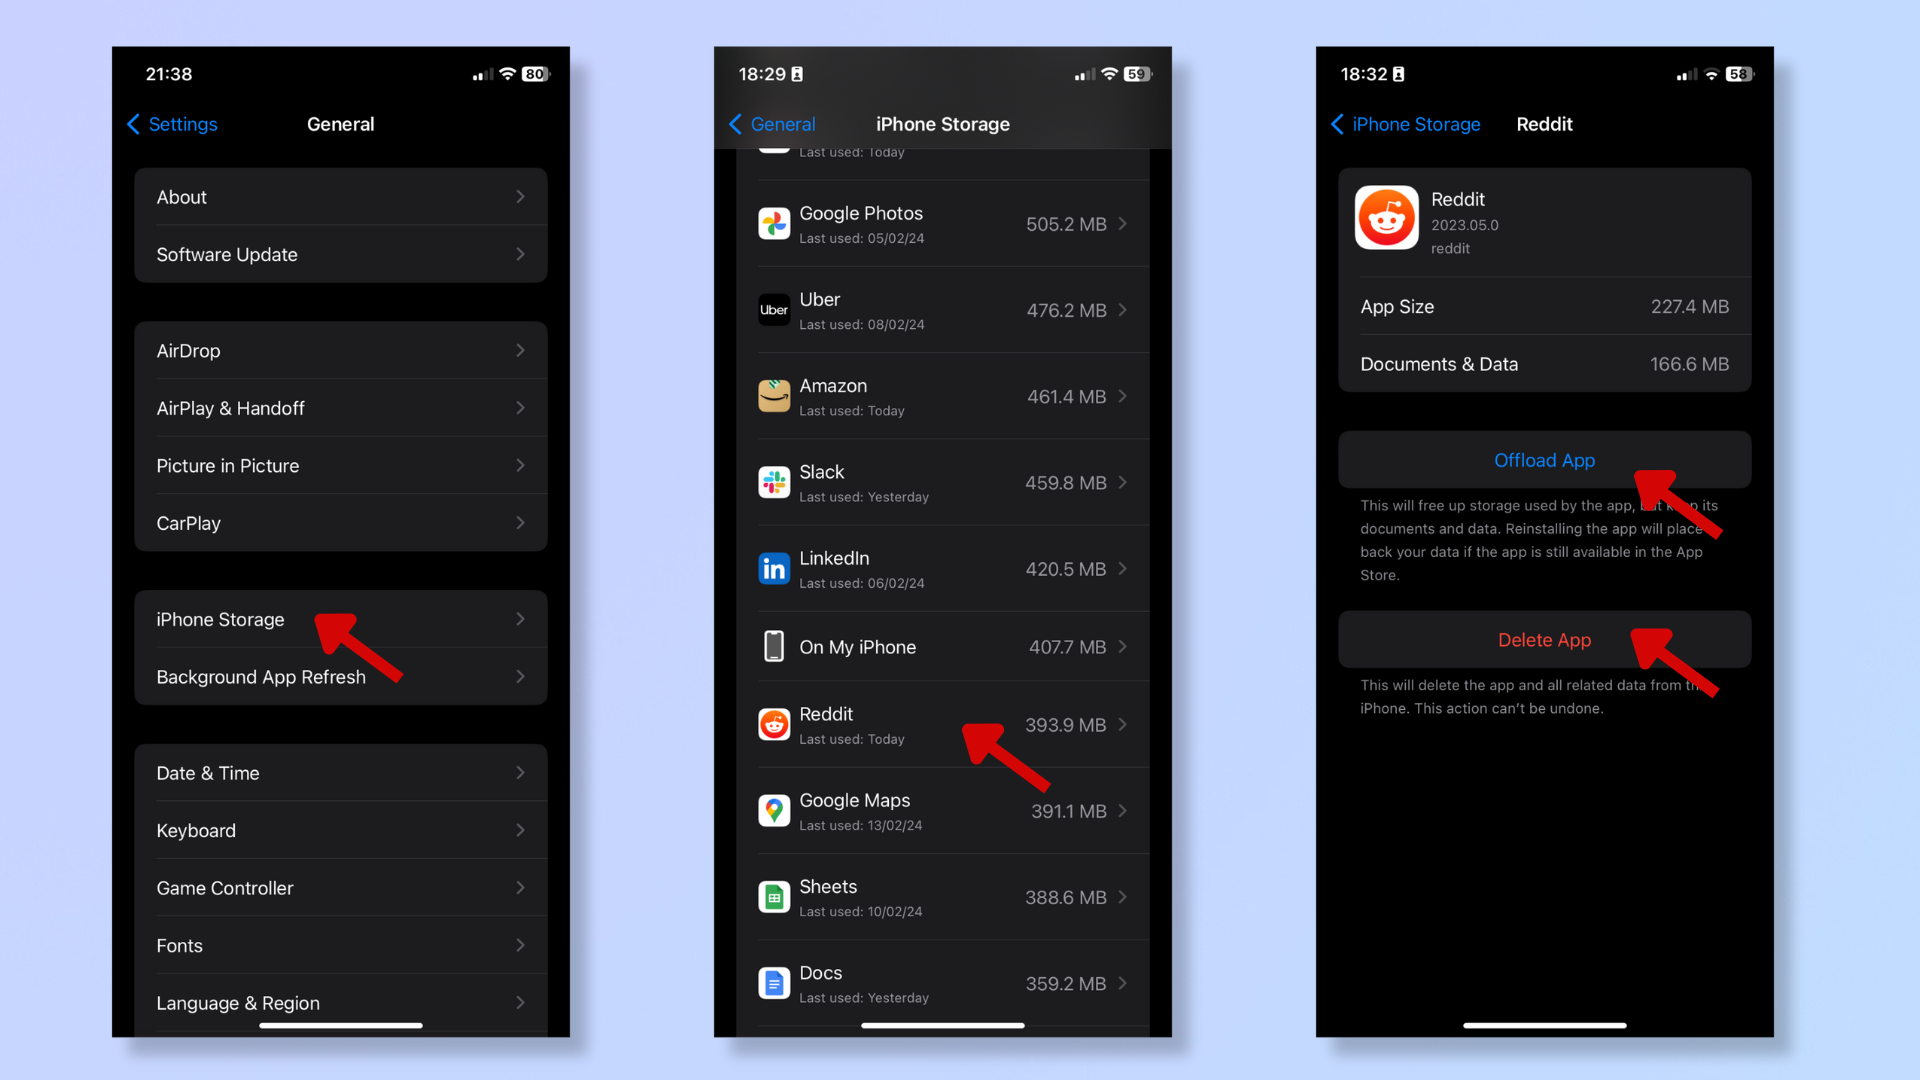
Follow the same steps as above (Settings > General > iPhone Storage) and scroll down the iPhone Storage menu to see how much space the apps are taking up.
Tap the app you want to delete, and then press Delete App at the bottom.
Alternatively, if you want to keep the app’s documents and data on your device but remove the app for additional storage, tap Offload App.
3. Delete music
(Image: © Future)
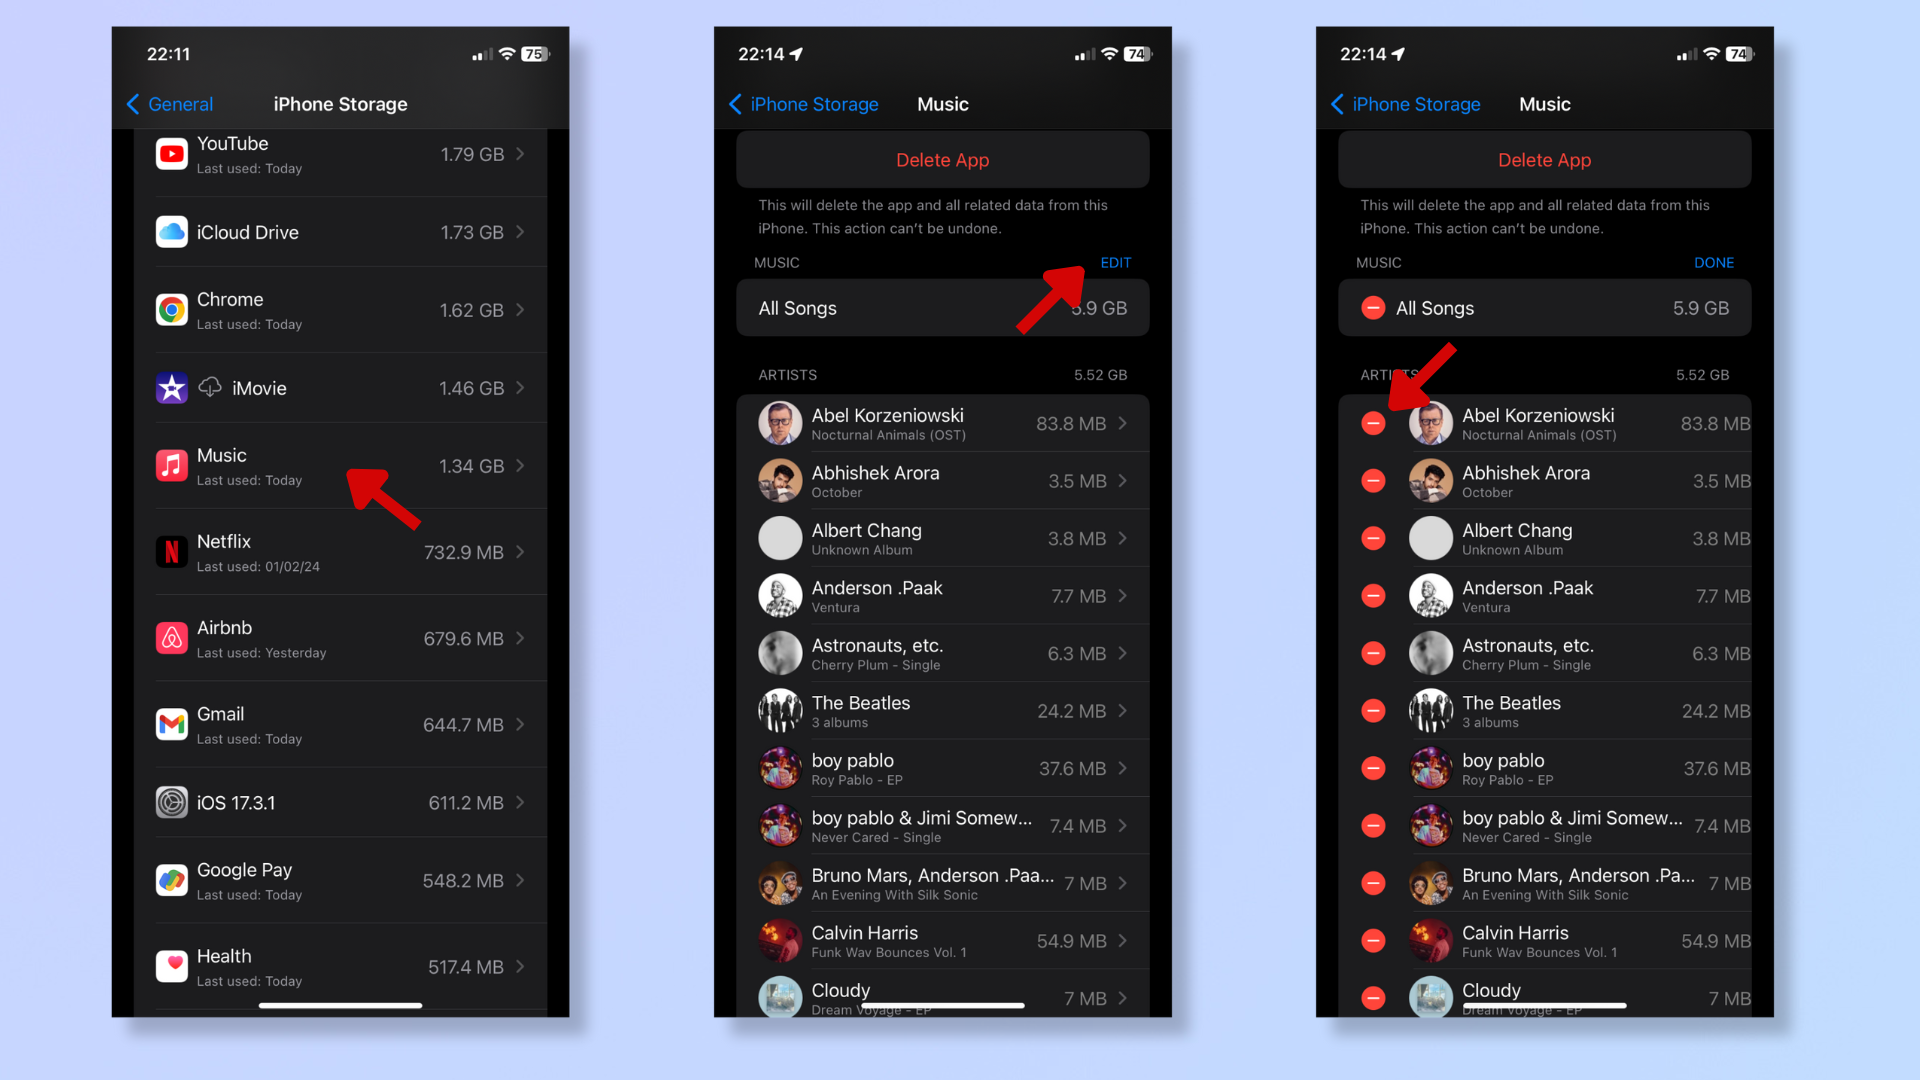
To delete music, go to Settings > General > iPhone Storage > Music. Tap Edit, and red minus icons will appear beside all the listed artists. Tap the minus icon beside the artists you want to remove, and press Delete.
You can also delete music directly through the Music app. Once in the app, access Albums, Songs, or Recently Added. Then, long press the tracks/albums you want to delete and tap Delete from Library.
4. Delete messages
(Image: © Future)
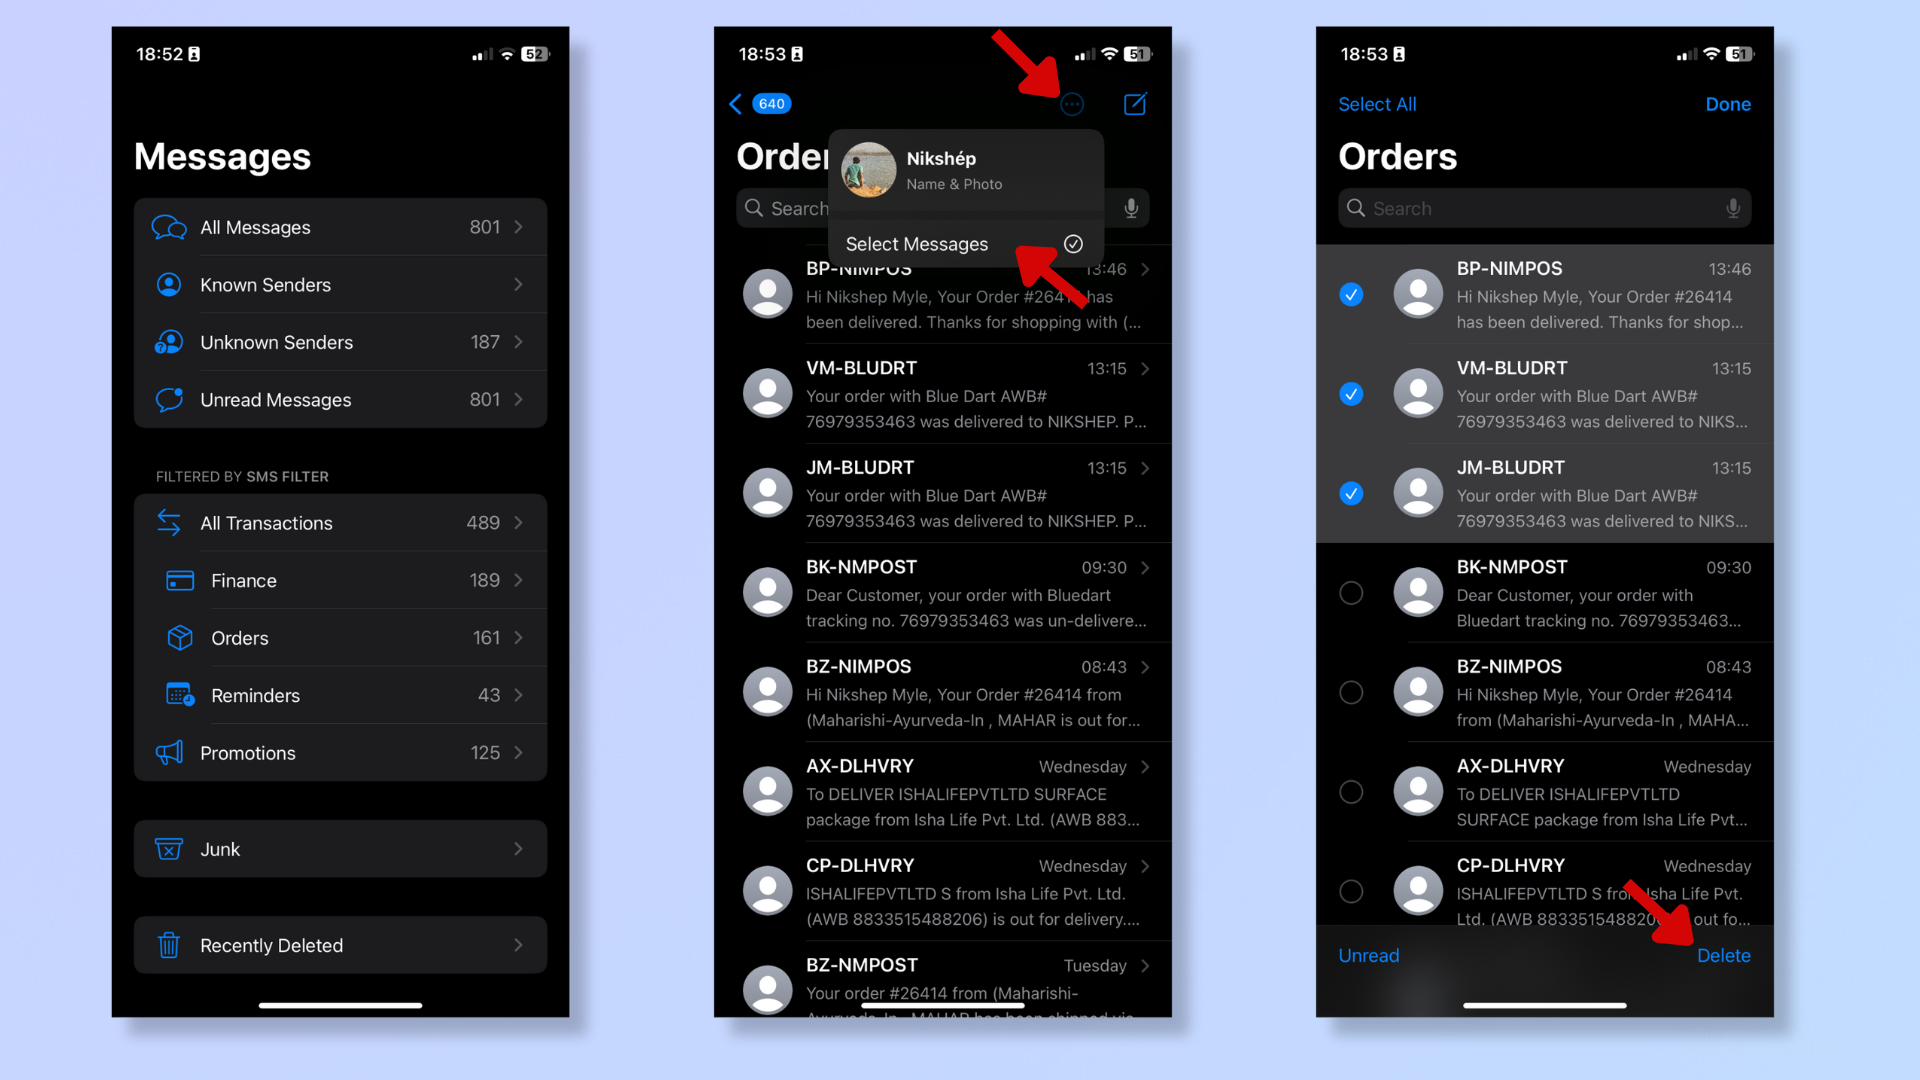
Open the Messages app and tap any message category you want to clear. Then, press the three dots at the top right corner and tap Select Messages. Next, choose the messages you want to delete and tap Delete at the bottom right corner.
To delete all the messages, repeat the steps above until you tap Select Messages. Then, press Select All at the top left corner and tap Delete at the bottom right corner.
To automate this process, head to Settings > Messages. Scroll down to find and select Keep Messages, which is under Message History. Choose from the three options on how long to store your messages (30 days, one year, or forever).
5. Clear Safari cache and history
(Image: © Future)
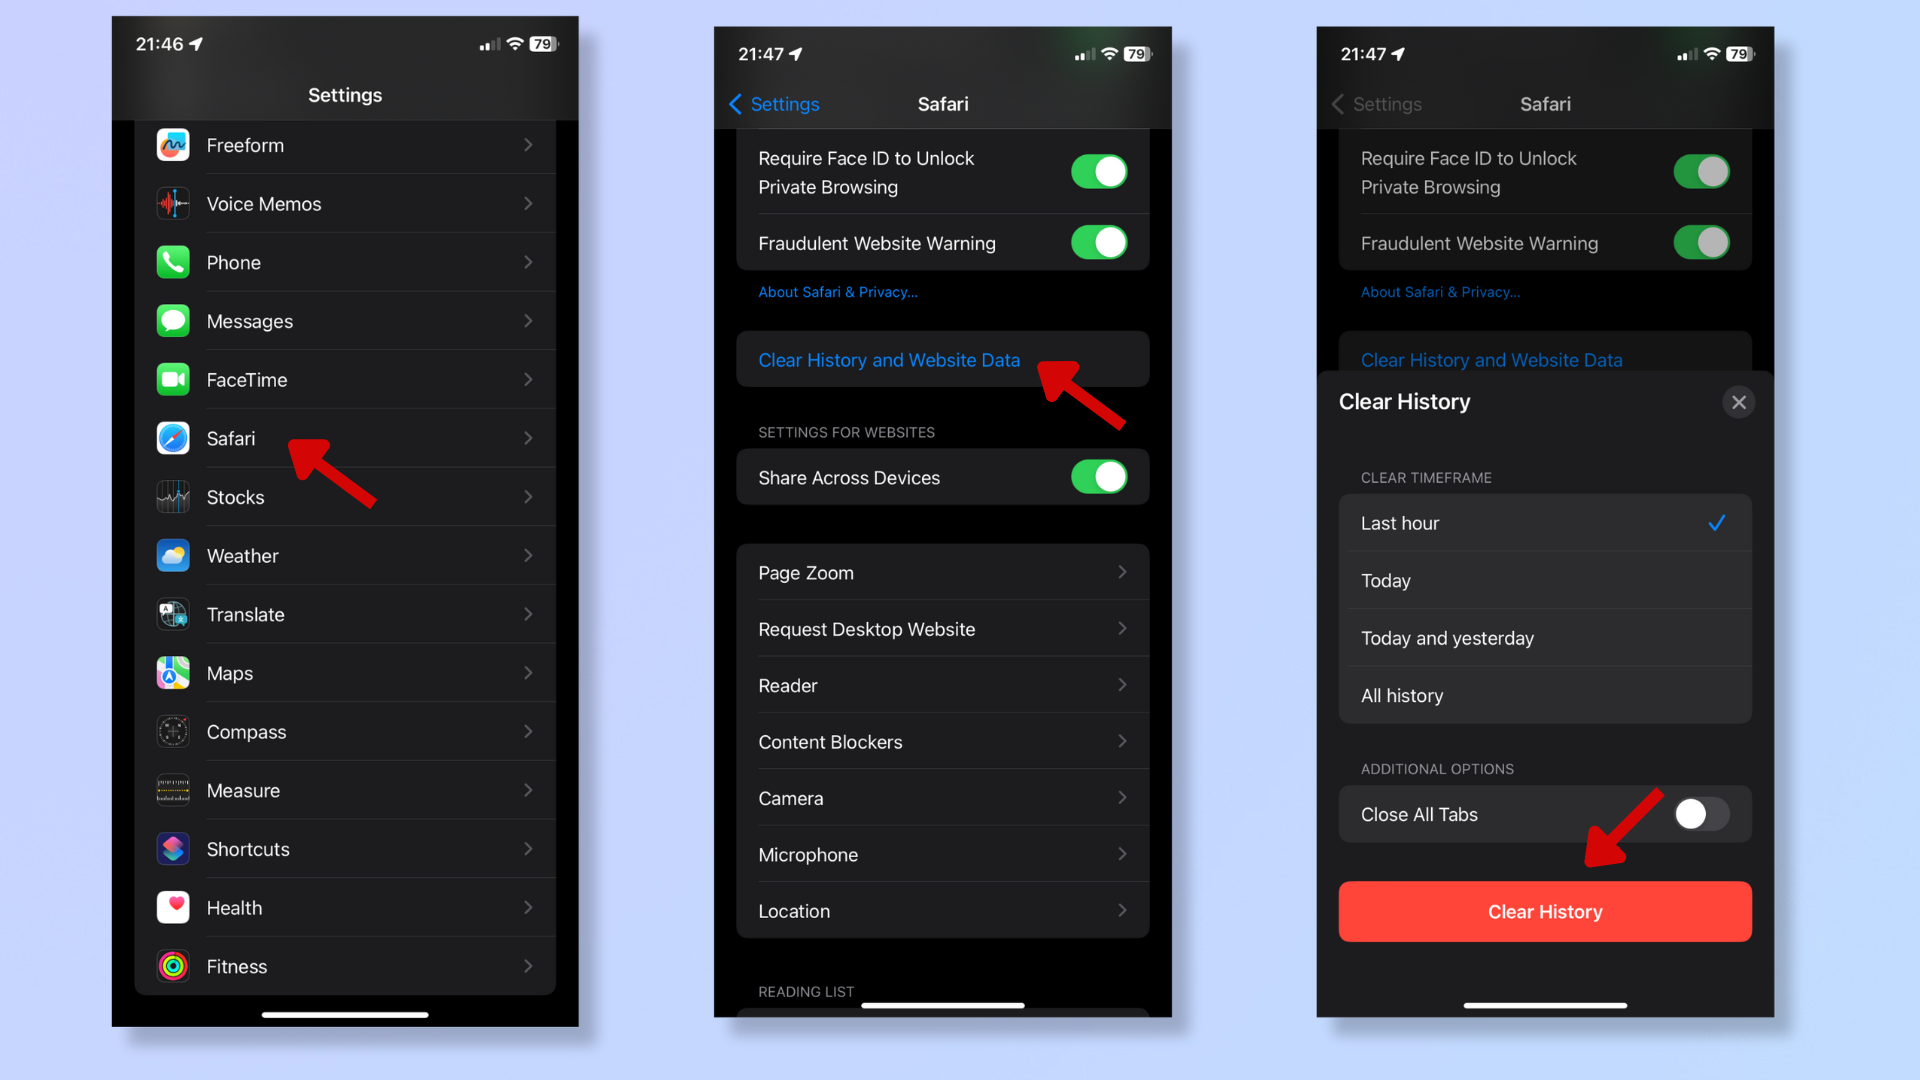
Head to Settings and scroll down to select Safari. Navigate down the Safari menu till you find Clear History and Website Data. Tap it to bring up additional options, like the timeframe for clearing the history, and once you’ve selected the duration, tap Clear History.
6. Clear Chrome cache and history
(Image: © Future)
If you use Google Chrome, open the Chrome app on your phone. Tap the three dots at the bottom right corner, and then tap Clear Browsing Data. Select Cached Images and Files, and then tap Clear Browsing Data at the bottom of the screen.
7. Backup media files to iCloud and optimize media storage
(Image: © Future)
Backing up your photos and videos to iCloud will save you plenty of storage space in the long run.
Additionally, to optimize your media storage, head to Settings > Your name > iCloud > Photos. Select Optimize iPhone Storage to ensure your device stores smaller versions of your media to save space (the full-resolution file downloads automatically when viewing the optimized file).
Final Thoughts
Done clearing space on your iPhone? Then it’s time to put that new-found storage to good use! The additional space will keep your phone running fast and not stop you from capturing memorable photos and videos.
If you’re interested, we’ve also covered five hidden iOS tricks to help you navigate your iPhone faster, how to setup a new iPhone, and how to use Find My iPhone.
